Anfänger-Stickstiche + Kostenloser Kaktus-Handstick-Sampler zum Erlernen der Grundlagen
Die Handstickerei ist ein uraltes Handwerk, das sich zu einem beliebten modernen Hobby entwickelt hat. Es ist eine unterhaltsame und entspannende Aktivität, die Ihrer geistigen Gesundheit zugute kommt, und eine praktische Fähigkeit, die es Ihnen ermöglicht, Textilkunst zu schaffen, Ihre Kleidungsstücke zu reparieren und zu verschönern oder originelle Heimtextilien und Geschenke zu kreieren.
Möchten Sie Handstickerei lernen? Dieses Handstick-Tutorial führt Sie Schritt für Schritt, während Sie Stickstiche für Anfänger lernen und ein lustiges Mustertuch mit einem abstrakten Kaktus in der Wüstenszene sticken. Laden Sie eine kostenlose Cactus PDF-Anleitung herunter und lernen Sie noch heute Stickstiche für Anfänger!
Start eines Handstickprojekts
Bevor Sie sich mit dem Erlernen von Stickstichen für Anfänger befassen, sollten Sie sich auf Folgendes vorbereiten:
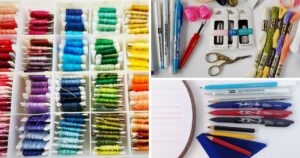
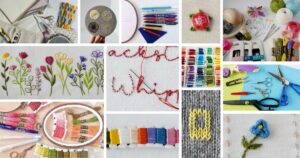
- Gather tools and materials. You will need a fabric, embroidery floss, a hoop, an embroidery needle, and small scissors. Head to the Hand Embroidery Supplies page on this blog for the list of tools and materials I use and recommend.
- Decide on the pattern transfer method you want to use. If you plan to embroider on light-colored fabric, the lightbox method with a friction pen is the most simple and affordable method that I use the most. Read the article “How To Trace Pattern on Fabric: Five Methods For Fast And Easy Embroidery Pattern Transfer” to learn how to choose the best fitting method and what materials you will need for it.
- If you are an absolute beginner, I recommend reading the article Hand Embroidery Basics: A Beginner’s Guide to Needlework before you dive into your first stitching project.
- Planen Sie im Voraus. Werden Sie Ihr fertiges Mustertuch in einen Rahmen für die Wanddekoration einrahmen? Oder möchten Sie es in einen Kissenbezug oder eine Tragetasche verwandeln? Schneiden Sie Ihren Stoff entsprechend zu und lassen Sie genügend Material für das Projekt übrig, das Sie später machen möchten.
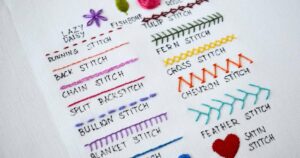
Stickstiche für Anfänger
Um das Erlernen von Stickstichen für Anfänger unterhaltsam und dynamisch zu gestalten, habe ich neun Handsticktechniken aufgenommen, die Sie zum Umreißen, Füllen und Dekorieren verwenden können.
Rückstich
Backstitch is the most basic embroidery technique for outlines, lettering, sewing, and filling. Small, straight stitches create fluid lines that can be embroidered straight or curved.
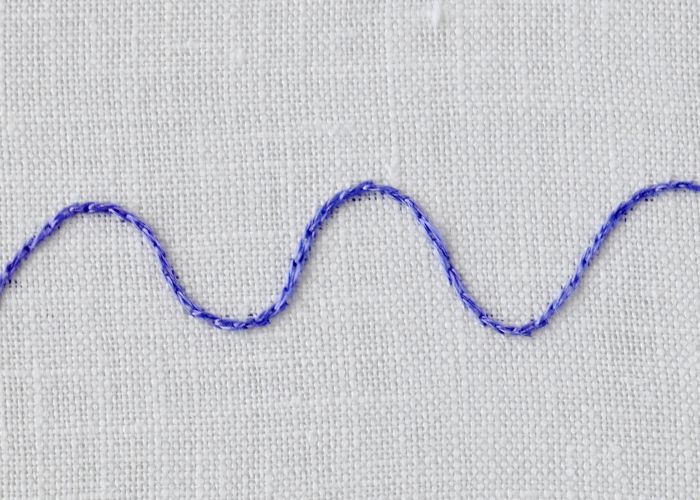
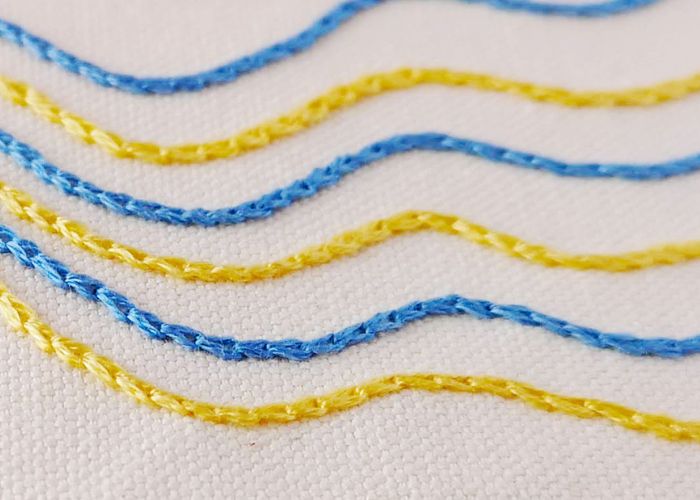
Stiel-Stich
Stem Stitch is another hand embroidery technique suitable for beginners and widely used in hand embroidery. This stitch creates a fluid line and is used for outlines, lettering, or filling. This stitch is indispensable in botanical embroidery.
Geteilter Rückstich
Split Backstitch is a variation of the Backstitch that creates smooth lines. This beginner-friendly technique is widely used for outlines, lettering, and as a base for filling stitches. In this Cactus sampler embroidery project, we will use Split Backstitch as an outline stitch and as a base for Satin Stitch and Long and Short stitch.
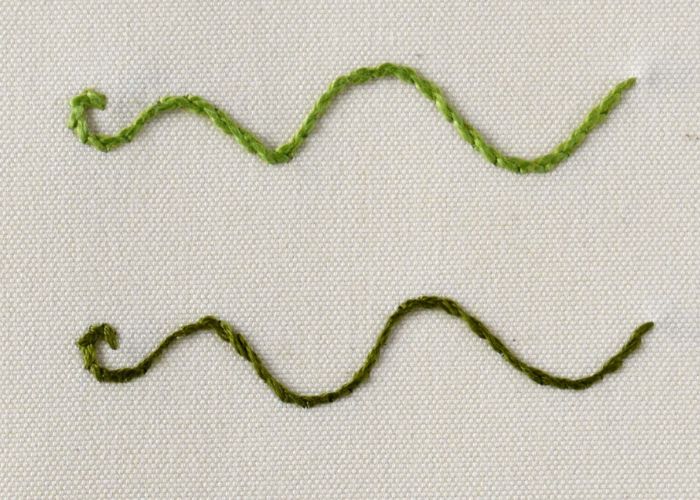
Kettenstich
Chain Stitch is a very decorative yet simple hand embroidery technique every beginner should learn. Small loops connected into a line create a decorative line, letters, or embellishments. You can use this stitch for borders, outlines, or filling.
Gelöster Kettenstich
Detached Chain Stitch is another beginner-friendly embroidery stitch that has multiple uses. With this stitch, you can add decorative accents to your embroidery project, fill it, create lines, or mix it with other stitches to make complex decorative bands.
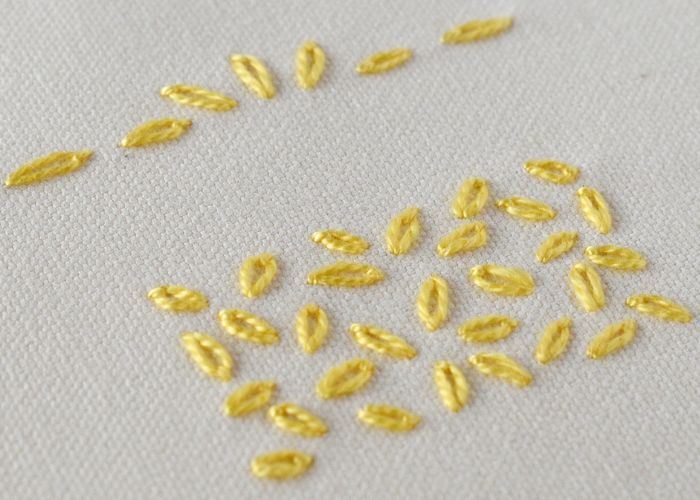
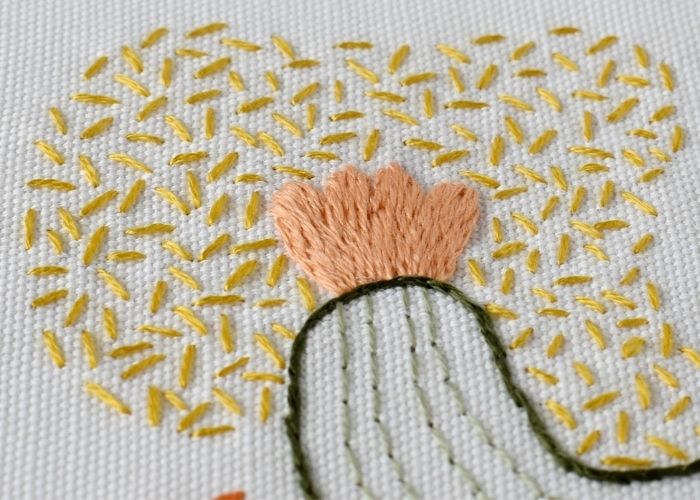
Perlstich

Seed Stitch is the most straightforward filling technique you can learn fast and use for various projects. This simple embroidery technique will surprise you with all its creative possibilities. Even if the method is straightforward, it has loads of options for personalization and variations – from length and colors to density and texture.
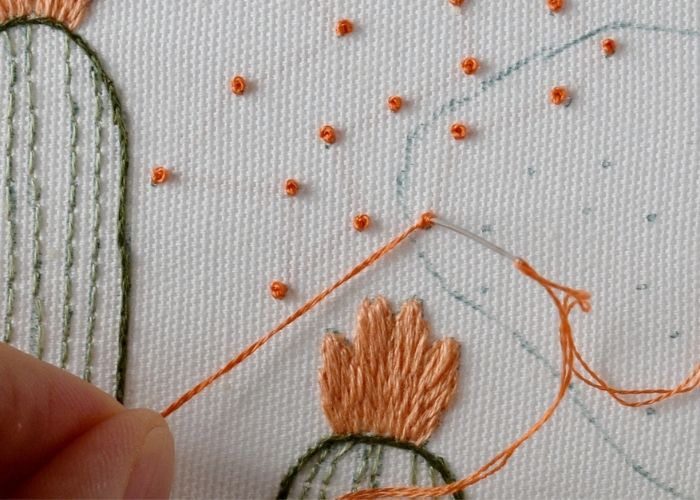
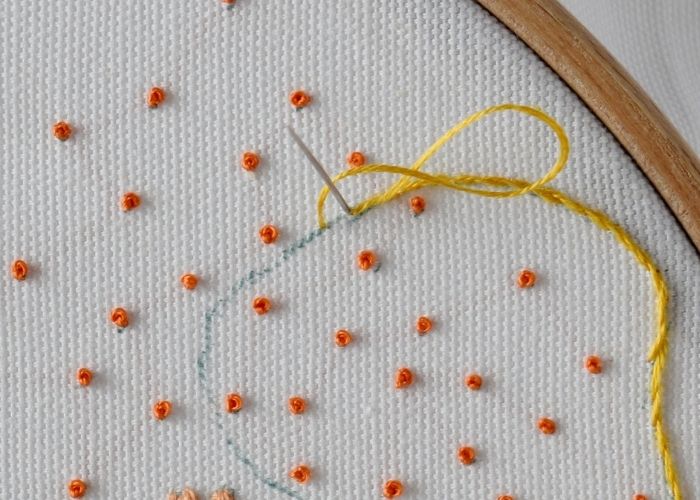
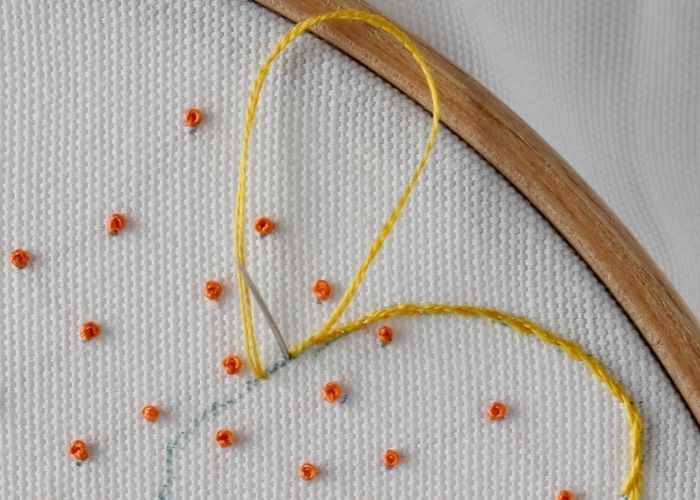
Französische Knoten
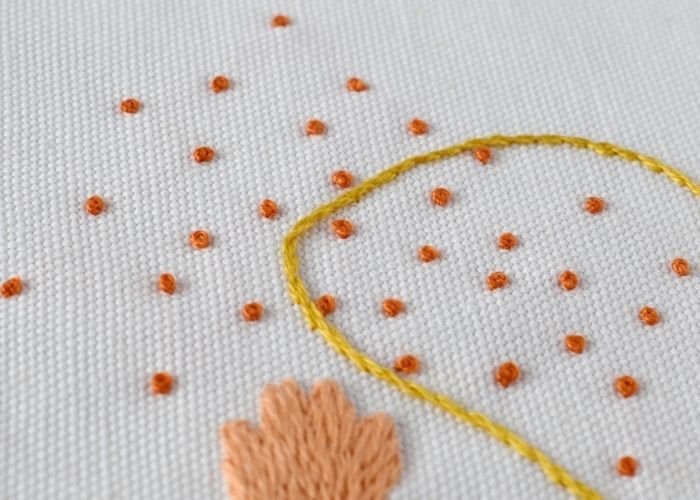
French Knot Stitch is a textural decorative hand embroidery technique. It has many uses – from filling areas and accent stitches to being a part of complex composite stitches.
Dieser Stich hat den Ruf, schwierig zu sein, aber keine Angst. Befolgen Sie diese einfachen Tipps, und Sie werden französische Knoten genauso lieben wie ich:
- Benutze beide Hände, um diesen Stich zu machen.
- Wickeln Sie den Faden 2 Mal um die Nadel (maximal 3 Mal). Wenn Sie einen größeren Knoten benötigen – verwenden Sie dickeres Garn oder mehr Fäden.
- Lasse einen kleinen Abstand zwischen dem Anfang des Stichs und der Stelle, an der du die Nadel in den Stoff nimmst. Der Knoten springt nicht auf die Rückseite des Stoffes.
- Ziehe den Faden langsam durch die Wicklungen zur Rückseite des Stoffes. Halten Sie den Arbeitsfaden bis zum letztmöglichen Moment unter Spannung, während er auf die Rückseite des Tuchs gelangt.
- Verwenden Sie eine Hutmachernadel anstelle einer Sticknadel. Es hat ein Öhr, das die gleiche Dicke wie der Schaft hat, so dass es einfach ist, die Nadel durch die engen Wicklungen zu führen, ohne am Öhr hängen zu bleiben.
Satin-Stich
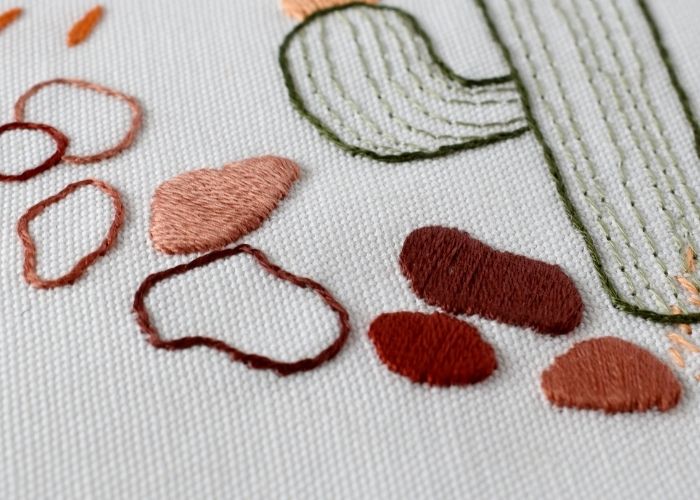
Satin Stitch is a popular filling technique that beginners should learn. You will find this stitch in many embroidery patterns and projects. Therefore, you should learn it at the beginning of your stitching journey. Satin Stitch is widely used but has a reputation for being a complex stitch.
Hier sind einige Tipps für einen glatten Satinstich:
- Dünnere Fäden (oder einzelne Fäden) funktionieren besser als mehr oder dickere Fäden.
- Geschliffenes Gewebe mit einer hohen Feinheit und einer festen und vollen Webart funktioniert besser.
- Halten Sie es klein; Versuchen Sie nicht, große Flächen mit diesem Stich zu füllen.
- Beim Sticken beginnst du den Satinstich in der Mitte und bewegst dich zu den Seiten des Motivs.
- Für schönere Kanten umreißen Sie zuerst die Form (wir verwenden den geteilten Rückstich für die Konturen).
Langer und kurzer Stich
Long and Short Stitch, auch Fadenmalerei genannt, ist eine Handsticktechnik zum Füllen, die den Stoff vollständig bedeckt. Dieser Handstickstich ist beliebt und wird häufig in verschiedenen Stickstilen verwendet. Die Fadenmaltechnik ist in der modernen Freihandstickerei beliebt, um Blütenblätter, Vögel und Tiere zu schattieren. In der jakobinischen Crewelarbeit werden größere botanische Elemente wie Äste und Tiere mit diesem Stich dargestellt.
Read the article “Long and Short Stitch for Round Shapes. Learn how to Embroider a Sphere and a Circle” for additional guidance on the Long and Short Stitch.
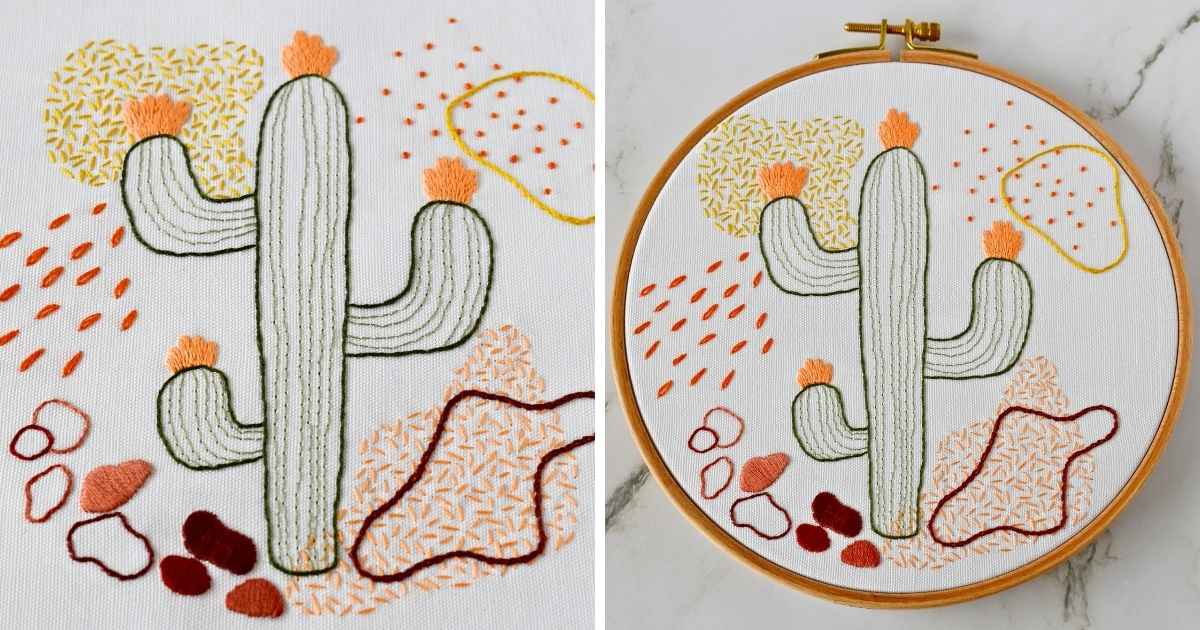
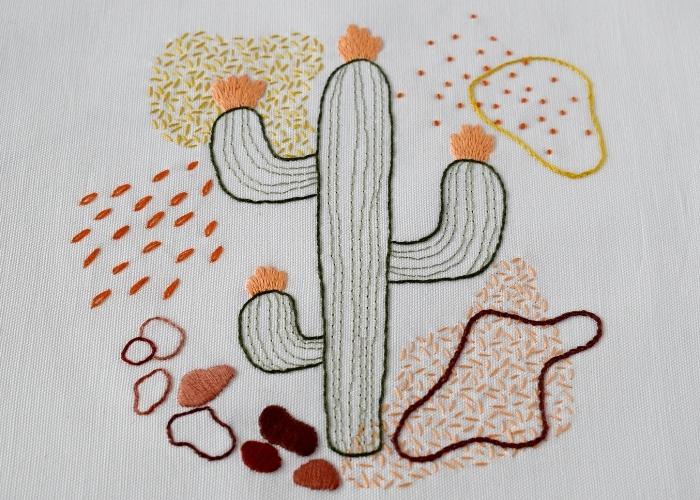
Handstickprojekt zum Erlernen von Stickstichen für Anfänger
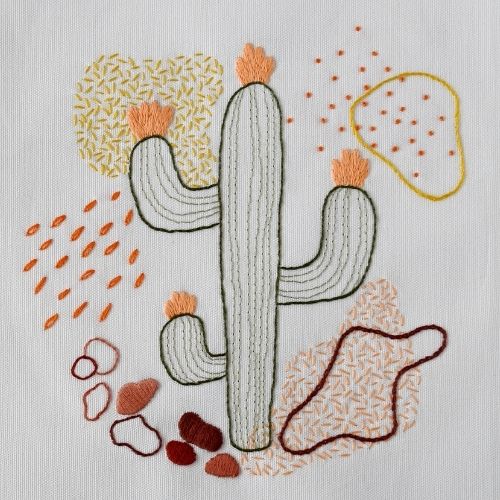
Kaktus: Handstick-Mustertuch
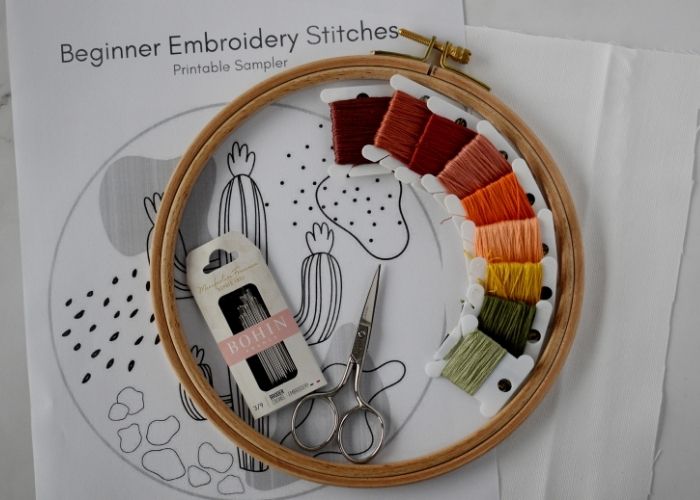
Mautgebühren und Materialien
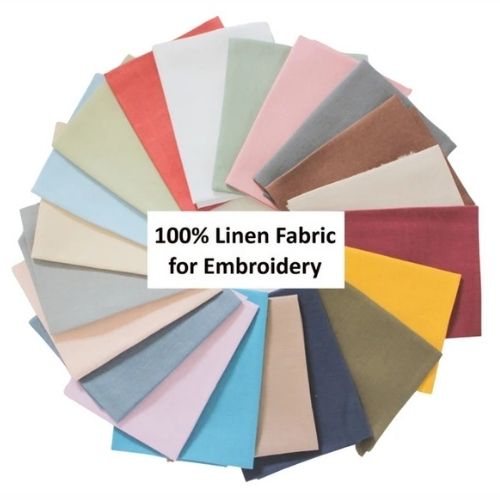
- Stoff. Ich habe eine weiße Leinen-Baumwoll-Mischung verwendet.
- Ein Reifen. Meiner ist 18 cm lang.
- Stickgarn. Ich habe DMC Stickgarn verwendet.
- Sticknadeln.
- Schere.
- Friktionsstift für die Musterübertragung.
Step-by-step hand embroidery tutorial
- Gather tools and materials
Download and print the Cactus PDF pattern. Choose colors for the project.
- Transfer the pattern to the fabric
I used a Lightbox method and a friction pen, but you can choose any method you prefer.
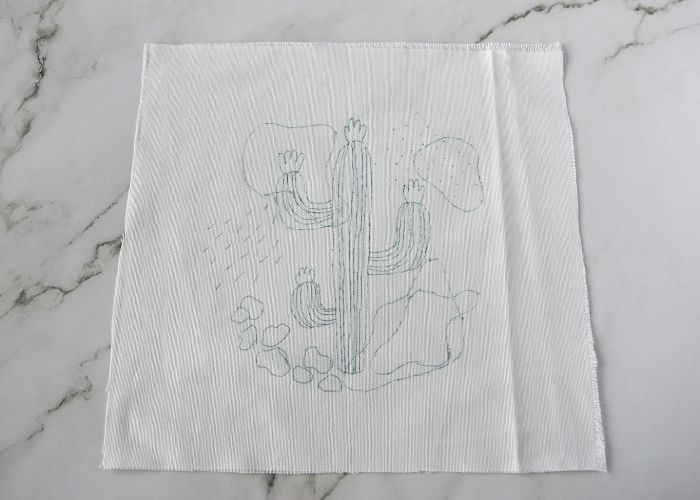
- Frame the fabric in a hoop
Adjust the tension and tighten the tensions screw. You can use a hoop stand for stability and the possibility to use both hands for stitching.

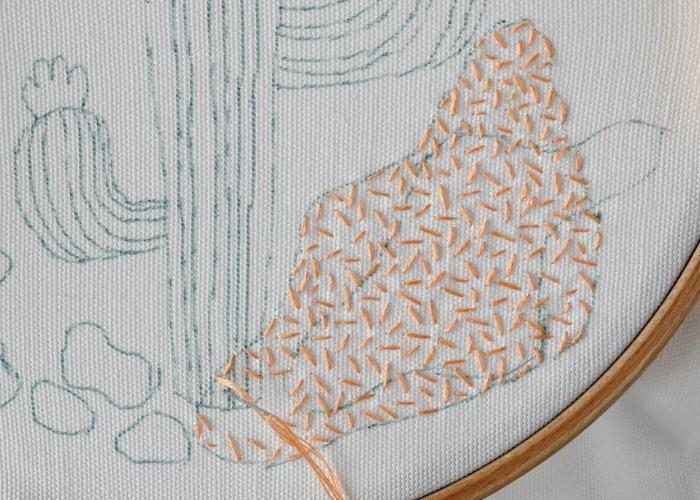
- Seed Stitch filling
Use two strands of embroidery floss and fill the shape with small straight stitches in random directions.
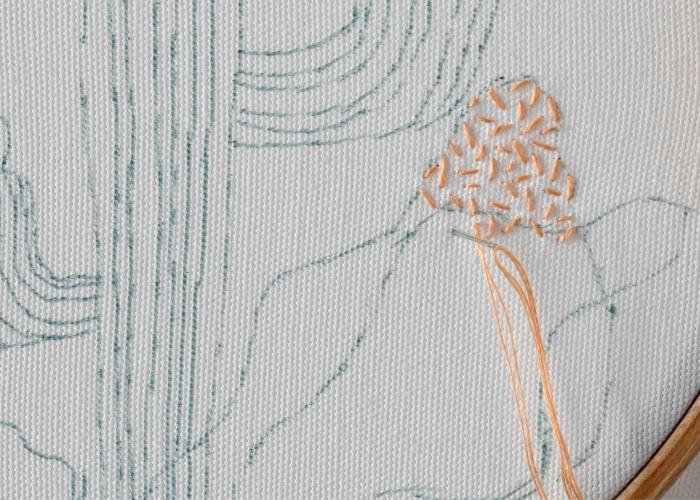
- Keep the same size
As you move, filling the shape, try to keep the stitches of a similar size and maintain the same density throughout the shape.
- Chain Stitch
Outline the shape with a Chain Stitch. Make small stitches as they follow the curves better.
- Close the shape
To make a nice finish to the shape, connect the last stitch to the first one in an invisible circle. Watch a video lesson, “Chain Stitch Mastery: Unlock Secrets of Chain Stitch Hand Embroidery!” for more tips on Chain Stitch embroidery.
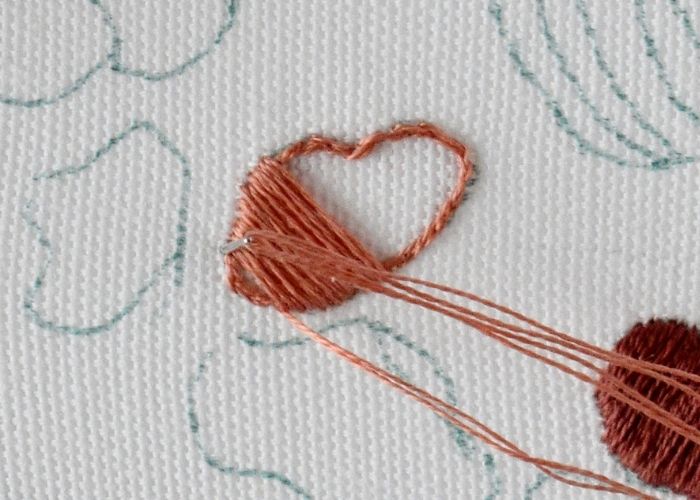
- Satin Stitch – outline
To make a Satin Stitch with a neat border, first outline the shape with a Split Backstitch.
- Satin Stitch – filling
Start filling from the center of the shape. Keep all the stitches parallel to the first one.
- Satin Stitch – filling
First, fill one side of the shape.
- Satin Stitch – filling
Then, return to the shape’s center and fill the design’s second part.
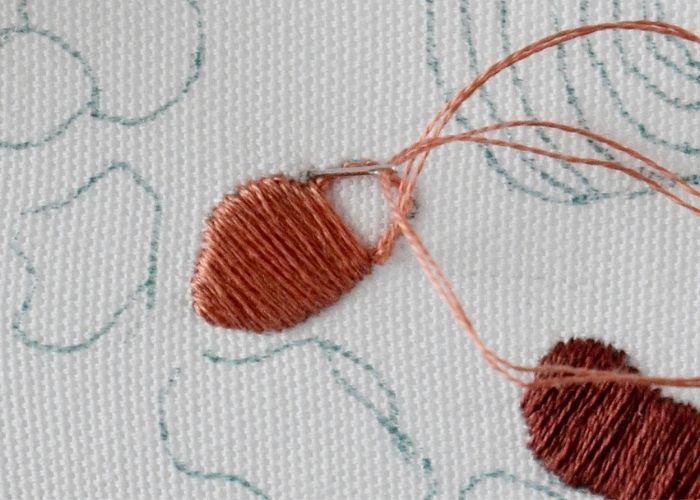
- Split Backstitch
After you fill some pebbles with Satin Stitch, outline others with a Split Backstitch.

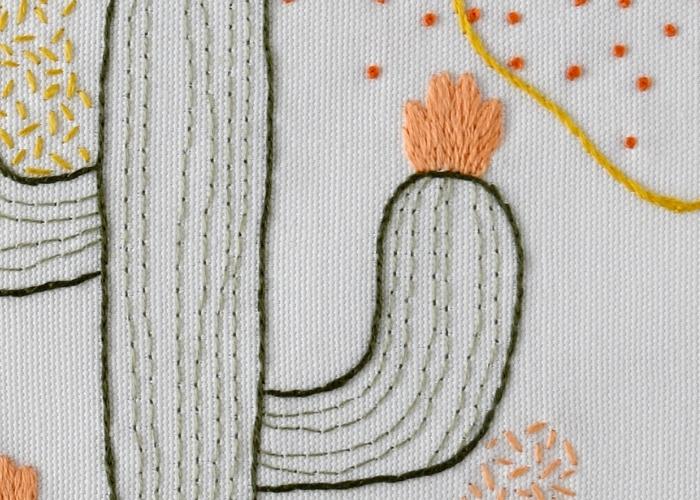
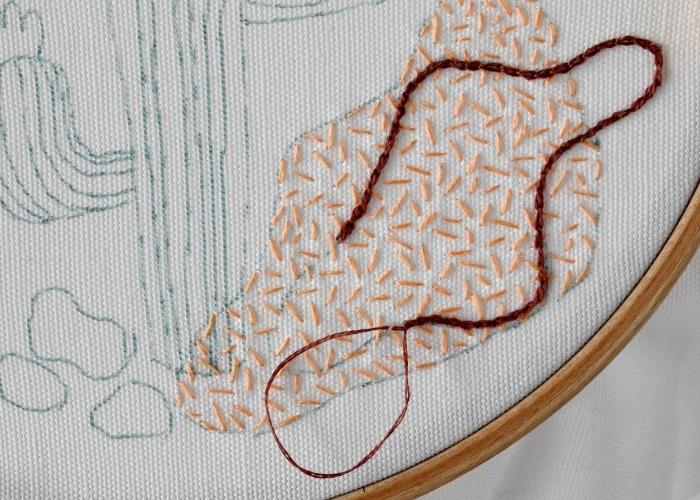
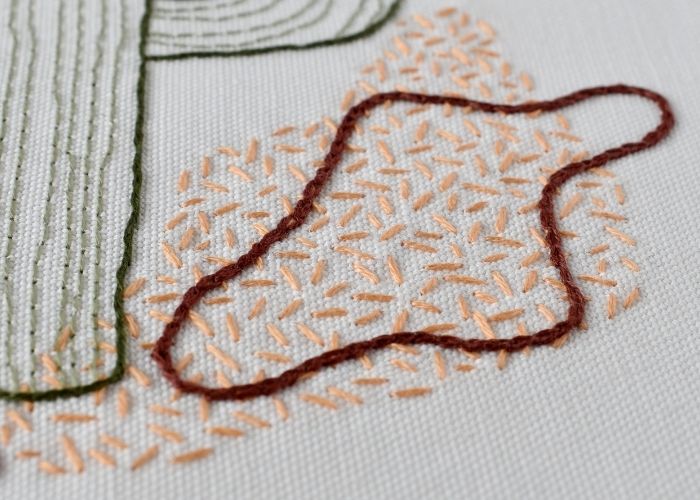
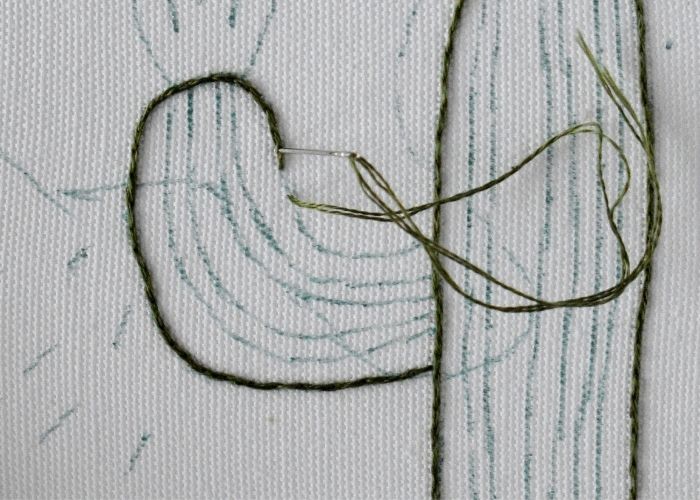
- Outline the Cactus
Use a Split Backstitch to outline the shape of the Cactus plant. Start with the central part.
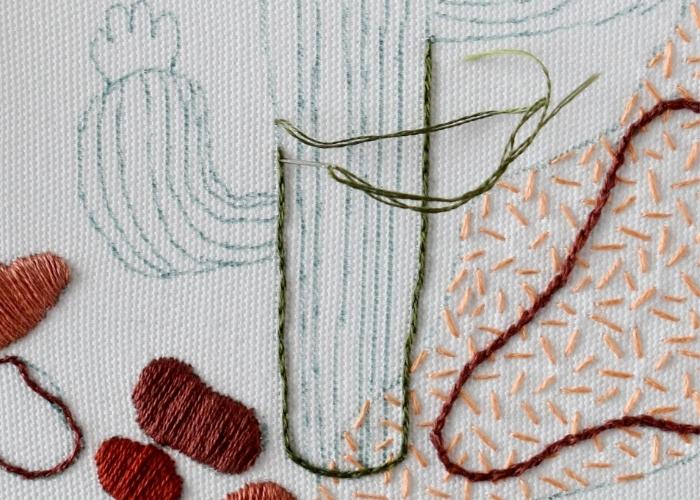
- Outline the branches
Use the same Split Backstitch to outline the branches of the Cactus.
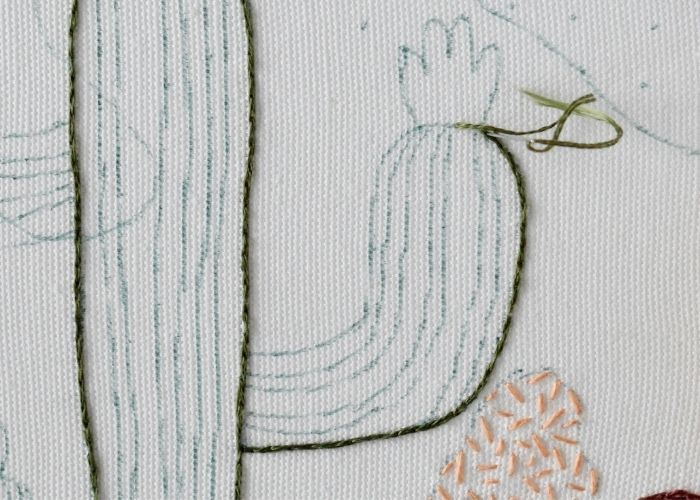
- Finish outline
On the curves, make your stitches slightly shorter; this way, the curves will look smoother.
- Backstitch
Embroider all the inner lines on the Cactus with a Backstitch. Use a single strand of embroidery floss.
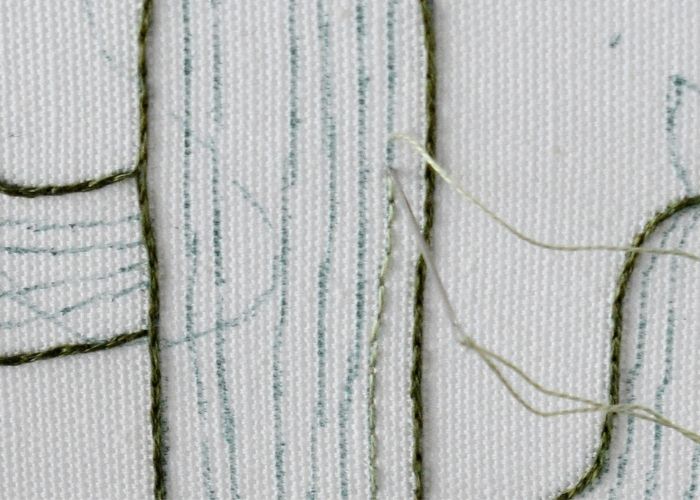
- Backstitch
You can embroider with a Backstitch in both directions, so do not cut the thread; move up and down and left and right until you embroider all the design lines.
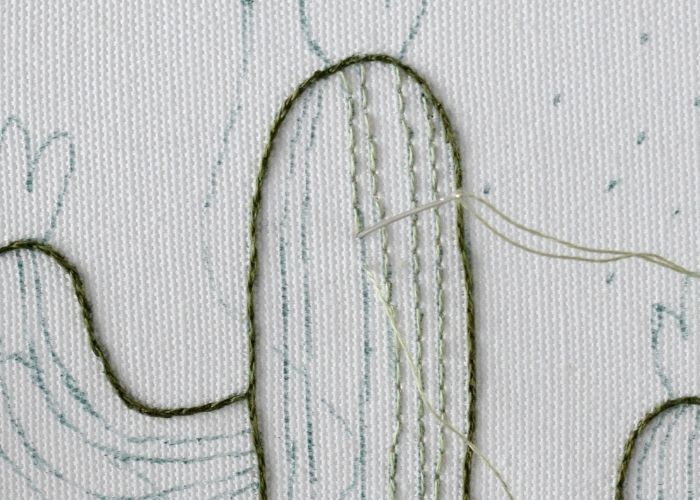
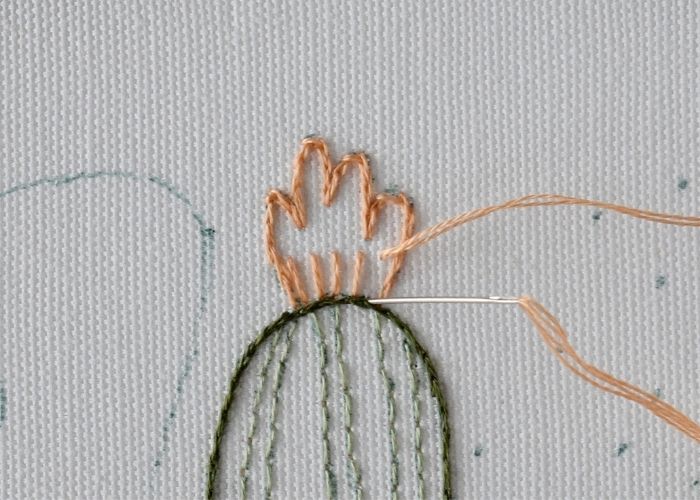
- Long and Short Stitch – outline
First, outline the flowers of the Cactus with a Split Backstitch. This will create a neat border for your Long and Short Stitch.
- Start with guiding lines
Before you start filling, make some guiding stitches that will indicate the direction for the upcoming stitches.
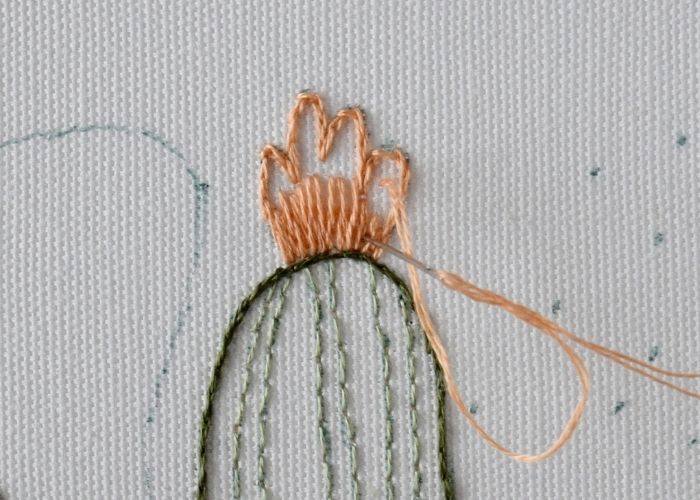
- Rows of Long and Short stitch
Add stitches row after row, till the entire shape is filled.
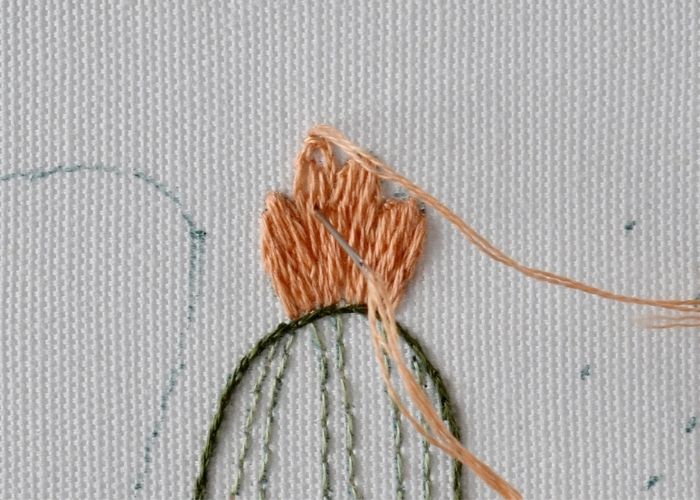
- Carefully fill the edges
Finally, make the stitches that will cover the last pieces of the fabric still visible.
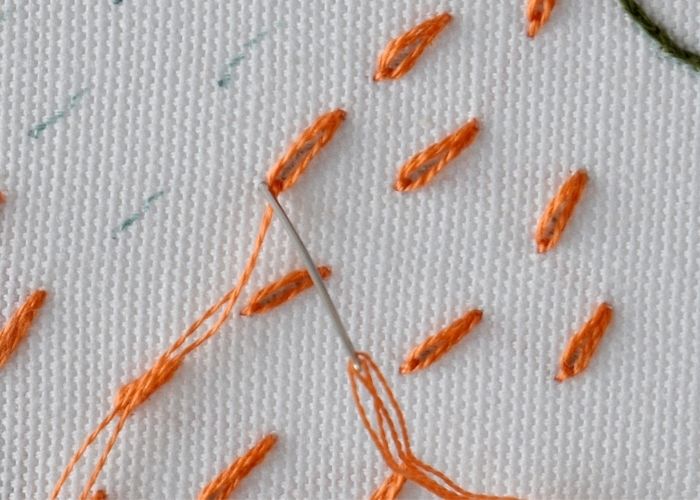
- French Knots
Embroider the cloud of French knots. Twist the thread around the needle twice.
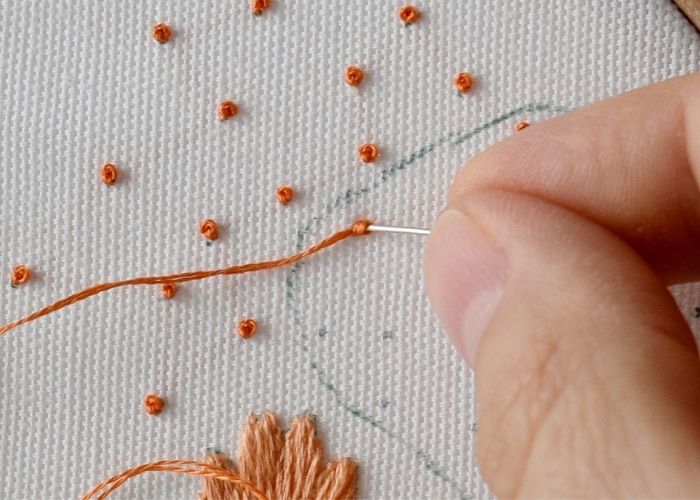
- French knots
Keep the working thread in tension till the last moment.
- Stem Stitch
Outline the shape with a Stem Stitch.
- Stem Stitch
Remember to keep the loop open in the same direction when you move around the shape.
- Seed Stitch
Fill the second shape with a Seed Stitch.

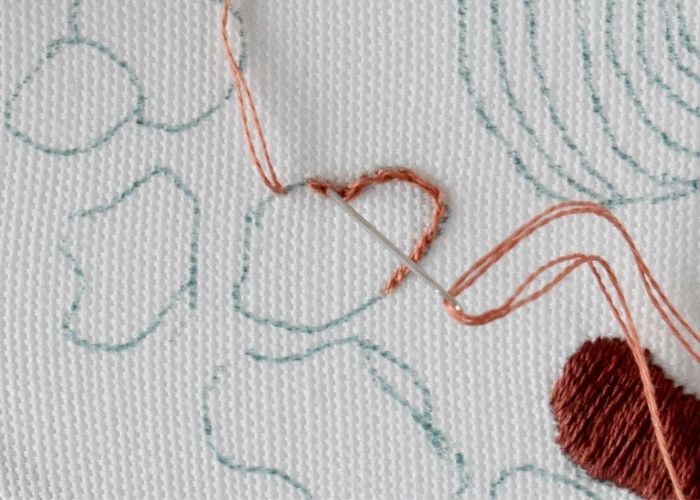
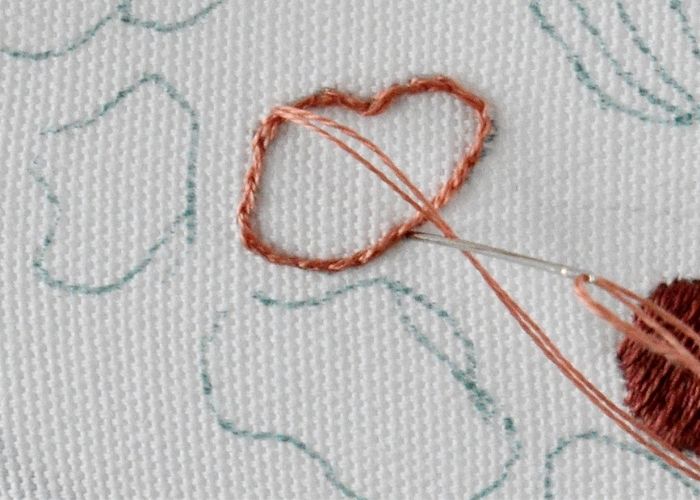
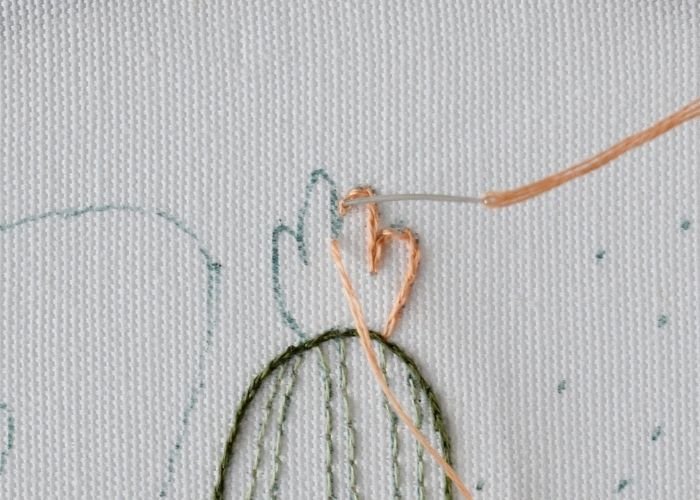
- Detached Chain Stitch
Make a single chain stitch on each line of the design. First, make an open loop.
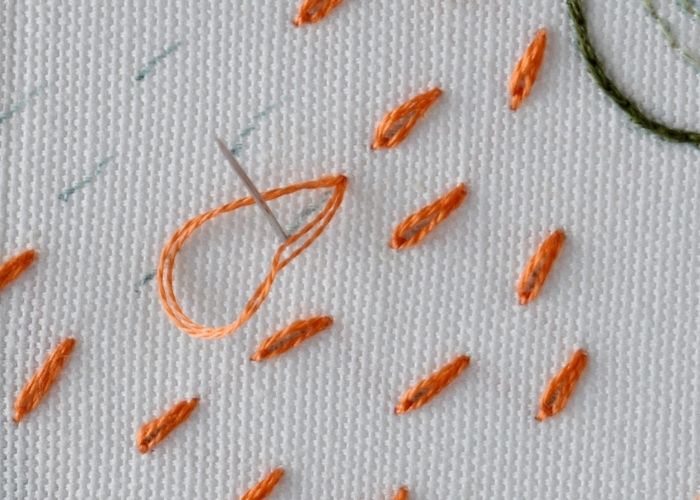
- Detached Chain Stitch
Tighten the loop and add an anchoring stitch.
Videoanleitung
Empfohlene Produkte
Disclaimer. To cover the cost of creating free embroidery patterns and video tutorials for this blog, I do sometimes link to products. Please assume these links are affiliate links. If you choose to buy through my links then THANK YOU! – it will make it possible for me to keep doing this.


Jetzt sind Sie an der Reihe

Dieses Handarbeitsprojekt mit Stickstichen für Anfänger wurde entwickelt, um Ihnen Inspiration und ein Muster zum Erlernen und Üben von Handstickstichen für Anfänger mit einem lustigen Design zu geben, das Sie später verwenden können, um etwas Nützliches und Praktisches zu schaffen.
Nehmen Sie sich Zeit und beeilen Sie sich nicht, das Kaktus-Design an einem Tag fertigzustellen. Geben Sie jeder Technik etwas Zeit und streben Sie nicht nach Perfektion! Nur viele Stunden des Übens und der Geduld führen zu sauberen Stichen.
If you wish to frame this embroidered Cactus in a hoop and use it as a wall decor – read the article “How to Frame Embroidery in a Hoop: Six Methods of Finishing the Back of the Hoop” and I’m sure you will find a method that suites your needs.
Don’t miss a thing!
Follow me on YouTube, Instagram, Facebook, Flipboard, Telegram and Pinterest. On the other hand, you can subscribe to the Practical Embroidery newsletter and get embroidery tips straight to your inbox every week!
Mehr zur Handstickerei für Einsteiger
Stickmaterialien für Anfänger. Alles, was Sie brauchen, um mit dem Erlernen der Handstickerei zu beginnen
Grundlagen der Handstickerei: Ein Leitfaden für Anfänger zur Handarbeit